Showing posts with label Recipes. Show all posts

Monday, December 31, 2012

BACON, AVOCADO, TOMATO GRILLED CHEESE SANDWICH


I discovered Bolillo bread in the Walmart bakery a few years ago and use it for all of my sandwiches. At my Walmart it runs around 1.68 for 6 buns. I cut each bun in half and butter all 4 sides and toast in a skillet or I melt butter in the skillet and toast it that way. I always make my hamburgers on these buns (it and chipotle mayo are my secret ingredients). I also use it for my BBQ, BLT’s, BAT’s, etc. It is also great for plain old grilled cheese sandwiches. The bread makes everything taste better so give it a try.


Ingredients per sandwich
  • 4 slice(s) bacon
  • cheddar cheese (or your choice of cheese)
  • 1 bolillo bun cut in half lengthwise
  • 1 medium tomatoes, sliced
  • 1 avocado peeled, and cut into slices
  • 1 tablespoon butter

Directions

  • Prepare bacon according to directions; drain set aside
  • Salt & pepper tomato and avocado slices as desired
  • Cut Bolillo in half. Cover both sides of each slice of bread with butter. Cook bread slices with the insides down on medium heat until toasted. Turn bread over in skillet and place cheese on the inside of the bread you just toasted. Once cheese has melted and the outside of bread has toasted, remove from heat and layer bacon, tomato, and avocado onto sandwich.

Enjoy!


Shared with

Wednesday, December 12, 2012

SUPER EASY CANDY COATED PECANS


This is a super easy, super quick candy coated pecan recipe.

What is so great about this recipe is that the main two ingreadients came from my yard ! The pecans came from my huge pecan tree and the eggs came from my chickens. This not only taste wonderful but is a great frugal recipe if you have access to pecan trees.


The first time I made this I remember looking at the nuts thinking that there was no way this was going to make those beautiful candied pecans I had seen pictures of.  The first two times you take it out of the oven to stir it, the coating is still going to look liquified so don't panic.  The third time you take it out to stir (after 45 minutes) you will see a huge difference.  When you take it out after one hour, you will have perfect candy coated pecans. 

NOTE:  I have started using parchment paper on my cookie sheet which has made clean up a breeze.


Ingredients:

2 egg whites
2 tbsp water

1 tsp vanilla
1 cup sugar
1/2 tsp salt
1 tsp cinnamon
4 cups (16 oz) pecans


Directions:

Preheat oven to 225. In a large bowl beat/whisk the egg whites, water, and vanilla. Add pecans and stir to coat. Mix together the sugar, salt and cinnamon, then pour over the pecans, stirring to coat. Spread pecans on a baking sheet that has been sprayed with cooking spray and bake for one hour, stirring every 15 minutes.


Whisk the egg whites with 2 tablespoons of water and 1 teaspoon of vanilla.


Stir in your pecans..


In a separate bowl, mix together the sugar, cinnamon, and salt. Sprink over the pecan/eggwhite mixture.


Stir well making sure to coat all of the pecans.


Spread the sugar-glazed pecans onto a baking sheet that has been sprayed with cooking spray.


Bake on low heat, 225, for one hour. You’ll want to stir about every 15 minutes.


This recipe featured at

Crumbs and Chaos


    At the Picket Fence,Balancing Beauty and Bedlam, Be Different Act Normal,   Blessed With Grace, Chef in Training, The Dedicated House, Finding Fabulous,  Funky Polkadot Giraffe, Gingersnap Crafts,  Him and Her, It’s a blog party. Lady Behind the Curtain, Ladybird Lane,   Ladybug Blessings,  A Little Nosh, , Lil Luna, Lovely Crafty  Home, Make Ahead Meals for Busy Moms, Mandys Recipe Box, Miz Helen's Country Cottage, Momnivore's Dilemma, Mrs Happy Homemaker, My Romantic Home, Naptime Creations, Not just a Housewife, Polish the Stars, Polkadots on Parade, Raising Homemakers,   Rattlebridge Farms, Sew Much Ado, TheShabby Creek Cottage,  The Shabby Nest, Simply Designing, Simply Sweet Home,  Six Sisters Stuff,  Skip to my Lou,  Someday Crafts, Sugar and Dots, Sweet as Sugar,  Sweet 2 Eat, The Trendy Treehouse, A Vision to Remember

Sunday, December 2, 2012

Hot Fudge Sundae Cupcakes


I have been toying with the idea of hot fudge cupcakes for awhile. Like everyone else, I am super busy so I use any shortcut I can find when baking. Though I prefer baking from scratch, it's just not in the cards at the moment. This is a quick, easy, I need to make something in a hurry because I don't have much time recipe.
 

Tuesday, November 20, 2012

White Chocolate Mousse in Phyllo Cups ~ A quick and easy dessert.


Mini phyllo cups make it swift and simple to create an elegant dessert. I needed a dessert for work and I didn't have much time. I simply pulled some whipping cream out of the refrigerator and some white chocolate chips, phyllo dough, and blueberries from the freezer and voilà …... instant dessert!


Sunday, September 30, 2012

HUGS CUPCAKES !

Here is an awesome recipe from my sister. These taste unbelievable and they are so easy to make. I promise you that you will not be disappointed !

  For step by step instructions with pictures, check out her blog @ Fabulous You.


Cake Ingredients:
 
1 milk chocolate cake mix
1 small box chocolate pudding mix
1 ½ cup milk
35 Hershey’s Hugs candy, chopped
1/3 cup oil
2 eggs

Preheat oven to 350 degrees. Line muffin pans with cupcake liners. In a medium mixing bowl, add the cake mix, pudding mix, milk, oil and eggs. Beat on medium speed for 2 minutes. Fold in chopped Hugs. Pour batter into cupcake holders. Bake for 15 - 20 minutes or until done. Do not over bake. Cool completely.

Saturday, September 29, 2012

Hershey’s Cookie & Creme Cupcakes with White Chocolate Mousse Filling

I love frugality so I tried to come up with a creative way to use up some of the Easter candy in the freezer. I decided on cupcakes.. I mean, who doesn’t love cupcakes with candy? Ok, maybe there are some of you out there but then you probably won’t be looking at cupcake recipes so I think I’m safe. I decided to make a chocolate cake with white chocolate mousse filling and Hershey’s cookies & creme frosting.I only had a white cake mix so I added some cocoa, sugar, and sour cream. (I’ll write more on this later - go here for recipe) and the Hershey’s cookies & creme candy that I used was little easter bunnies.


For the cake, use your favorite chocolate cake recipe (homemade or from a box)

White Chocolate Mousse Filling
  • 2 cups heavy whipping cream
  • 2 cups white chocolate chips

Hershey’s Cookies & Creme Frosting
  • 4 Hershey’s cookies & creme bunnies :) or 3 Hershey’s cookies & creme candy bars (use more or less for desired sweetness)
  • 3 cups powdered sugar
  • 1/4 cup butter at room temperature
  • 1/2 cups Crisco baking sticks (If you don’t like or want to use Crisco, simply use 1/2 cup (1 stick) of butter)

Instructions

Melt the Hershey’s Cookies & Creme Candy in a small dish in the microwave. In a separate bowl beat, butter, Crisco, and the melted candy on medium speed. Add 3 cups of powdered sugar slowly adding it 1/2 cup at a time. Once the sugar as been incorporated with the butter, increase mixer speed to medium. If mixture is too thick add 3-4 tablespoons of milk or cream. If mixture is too thin, add more powdered sugar 1/8 cup at a time.


Shared with these Awesome Sites :Bear Rabbit Bear, Chef in TrainingCrafty Texas Girls, The Country cook, Eat 2 Gather, Elizabeth & Co, Favorite Finds, Fireflies & Jellybeans, The Frugal Girls, I Should Be Mopping the Floor, It’s a Keeper, Jam Hands, Kitchen Fun with My 3 Son,, A Little Nosh, Mandy’s Recipe Box, Miz Helens Country Cottage, Mrs. Happy Homemaker, Nap Time Creations, Sassy Sites, Skip to My Lou, Something Swanky, Sugar & Dots, Tater Tots & Jello, You are Talking too Much, Uncommon

LOADED POTATO SOUP

I love easy recipes that taste like they took hours to make. This is the perfect potato soup. Even if you are not a potato soup lover (and I’m not) you will LOVE this recipe! The great thing about this recipe is that it’s a basic cheese & potato soup and you get to add the “toppings” you like when you get ready to eat it. This keeps all of those sour cream, chive, or bacon (gasp!), people happy. It’s perfect for those picky eaters
 
The great thing about recipes is that they can be modified to suit your needs.  You could lower the fat in this recipe by using a butter substitue, skim milk for the half-and-half, a low fat cheese, low fat sour cream, and omit the bacon. 


Ingredients:

1 ½ pounds of red potatoes
¼ Cup butter or margarine
½ Onion (chopped)
1/8 cup flour
2 cups half-and-half
2 cups of milk
8oz of Velveeta cheese
Salt, Pepper, & Garlic Powder to taste
Bacon Bits
Sour Cream
Fresh Chives
Shredded Cheese

 Directions:

  1. Dice potatoes into 1 inch cubes (Do not peel)
  2. Place in a saucepan and cover with water. Cook until slightly tender. (about 10 minutes)
  3. In another large pot, place butter and melt.
  4. Stir in onion and saute until onions are tender and translucent.
  5. Add flour and mix until smooth
  6. Gradually add half-and-half and milk.
  7. Stir constantly until the mixture begins to thicken
  8. Add Velveeta to mixture, stir well.
  9. Add drained potatoes to mixture. 
  10. Stir in salt, pepper, and garlic powder to taste
  11. Cooked until cheese is melted and potatoes are done.
  12. Serve in individual bowls and top with sour cream, shredded cheese, bacon, and fresh chives.
  13. Enjoy !


This Recipe Shared at:

CABBAGE CREOLE

This is one of my favorite go-to foods.  Even people that don’t like cabbage love it !   I remember as a child, my mother would make this.  I hated cabbage.  I repeat, hated cabbage.  So did my sister and every other young person that I knew.  The funny thing is that we all loved this creole. 

I must also confess that though this is a “creole”, but I make mine more like a soup.  Just don’t add the water and you will have this thick bowl of yumminess. 

 This creole also freezes well so make a double batch and save it for a busy night.  You could even whip up a batch of cornbread to go with it! 
 

I used a can of mild rotel and a can of diced tomatoes.  You can use regular rotel if you like it hotter or use only tomatoes if you do not want any spice to it.  I went somewhere the middle.


Chop one onion and one bell  pepper.


Put the chopped peppers and the ground beef into a pan  and cook until meat is done and peppers and onions are tender.


While the meat mixture is cooking, go ahead and chop your cabbage.  If someone really doesn’t like the taste of cabbage, chop it really small.
( It’s kind of like sneaking vegetables into your kids food without them knowing it.)
  Remember….cabbage cooks down so it becomes much less noticable but you still get the yummy taste.

.
Dump the cabbage, tomatoes, and can of chedder cheese into the meat mixture. I then fill up the chedder cheese can with milk and pour into the pan.  This just makes it a little creamier but is not necessary. 


Cook until the cabbage is tender.  I then add about 1/4 block of velveta and stir it in.  Again, this is because I just love cheese on anything but is not necessary.

Here is what it look like when done.  As you can see, I made mine more “soup-like”.

Ingredients: 

1 lb. ground beef
1 head cabbage
1 can stewed tomatoes
1 can Ro-Tel tomatoes with green chilies
1 can Cheddar cheese soup
1 cup milk
1 lg. onion
1 bell pepper
Velveta cheese (optional
)

Directions:

Brown ground beef, onion, and bell pepper.  Add cabbage, tomatoes, and chedder cheese soup. Fill empty cheese can with milk at add to mixture. At this point, you may want to add enough reach the consistancy that you want. Since I like mine more soup-like, I add 3-4 cans of water.  If you want it thicker, just add less water or no water at all.  Simmer until the cabbage is tender.  This recipe also  freezes well.  I freeze mine in individual bags which makes it easy to heat up a bowl for one.


PORK LOIN WITH VEGETABLES

Need a simple easy meal?
Make a Roast or Pork Loin with Vegetables…
 
 
I throw a roast (I used a preseasoned pork loin) into the crockpot when I leave for work in morning, turn it on low, and nine hours later…Viola !
 
 
When I get home all I have to do is line a dish with aluminum foil (for easy clean up) and place the pork loin in the middle.  I then start adding the vegetables. 
 
 
I add cabbage, carrots, potatoes, and onions.  You can add any vegetable that you like.
 
 
Take your chosen vegetables and place them around/over the meat.
 
 
Then put your seasoning/spices over the vegetables.  Use whatever seasonsings you like. 
 
 
 Take some of the liquid left in the crockpot…..
 
 
And pour it over the seasoned vegetables.
 
 
Cover the dish in foil, this keeps it from drying out while cooking.
 
 
 Cook for 45 miniutes to an hour (depending on the amout of vegetables)  then remove foil.  I cut the butter into slices  and place them across the vegetables and then stick the dish back in the oven for about 15.  Since the foil is not over it this time, the vegetables with brown slightly and the butter caramelizes making it so yummy.   
 
Ready to eat !

Green Chile Citrus Chicken

It seems like there are just not enough hours in a day so I love having simple meal ideas. There are so many quick and easy ways to make chicken and the Baja Citrus Marinade goes perfect with the green chiles.

This recipe requires only 4 ingredients: chicken, marinade, green chiles, and cheese. As with any recipe, change what you don’t like and try a combination of ingredients to create your own quick and easy recipes.

I marinade chicken overnight with McCormick Baja Citrus and then I tenderize the chicken. Beating your chicken flat is not necessary, I just like mine that way.
Cook chicken until done. I use an iron skillet but you could bake or grill yours.
I then saute my green chiles in the same skillet as the chicken which gives the chiles a little bit of flavor.
Return the cooked chicken to the skillet, cover it with the green chiles,
and then add your favorite cheese. I used Monterey Jack. (I plan to try pepper jack next time) Simply pop it into the oven until the cheese melts.
Enjoy !

Hot Onion Souffle Dip


This is the time of the year you want to start eating those yummy hot dips instead of those cool summer dips and here is the perfect one …..


This is the best stuff I have ever had! I could literally eat it every day. A very kind caterer left me some when she packed up to leave after catering a wedding at the park where I work. One bite and I knew I had to find a recipe for it. I looked over several recipes and after several combinations, I ended up with the recipe below.
To be honest, I don’t measure my ingredients. I just dump whatever I happen to have on hand into a bowl. I usually make a small batch by using only one 8oz package of cream cheese. I then throw in a small onion (chopped) and dump the cheese in “unmeasured”. But if you are the type of person who needs exact measurement…….

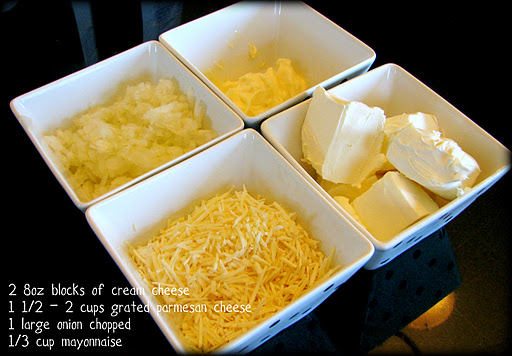
2) 8-oz blocks of cream cheese
1 1/2 to 2 cups parmesan cheese (grated or shredded work, but shredded is better)
1large onion (chopped)
1/3 cup mayonnaise


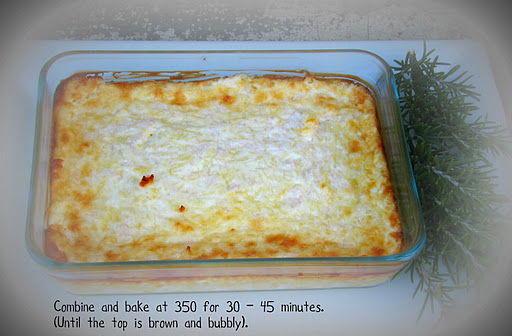
Combine and bake in a 350 degree oven for 30-45 minutes (depending on how brown you like the crust on top). It can be made in a pie plate or a small casserole dish. I serve mine with pita chips.
 
This is one of those recipes that you can add extra of the things you love and use less of what you don’t. I usually add extra onion and less cheese because that is the way I like it!


The Best Fruit Dip EVER !


Hands down, this is the easiest, best tasting fruit dip ever. I have been making this fruit dip for about fifteen years. It actually came about as an accident. I wanted to make some fruit dip and could not remember what you actually put in fruit dip. I couldn’t decide if it was cream cheese and sweetened condensed milk or was it cream cheese and marshmallow creme? I was pretty sure there was cream cheese involved somehow. I finally decided to just dump everything in together. How could you go wrong. Anything with cream cheese is good and who doesn’t like marshmallow cream? And sweetened condensed milk, well….I won’t even go there. Let’s just say there is not ever a drop left in the can. EVER! And that it will cut your tongue if you are not careful while licking the lid….I mean cleaning the lid, before disposing of the can.

 
Here is how to make it:
 
1 8oz package of Cream Cheese
1 container of Marshmallow Fluff
1 can Sweetened Condensed Milk
 
That’s it. Mix everything together. (I use a hand mixer) Make it ahead of time and just pop it into the refrigerator. It taste better after it has been in the frige for a few hours. Serve with fruit of your choice.


This Recipe Shared at:

CUCUMBER DIP

 
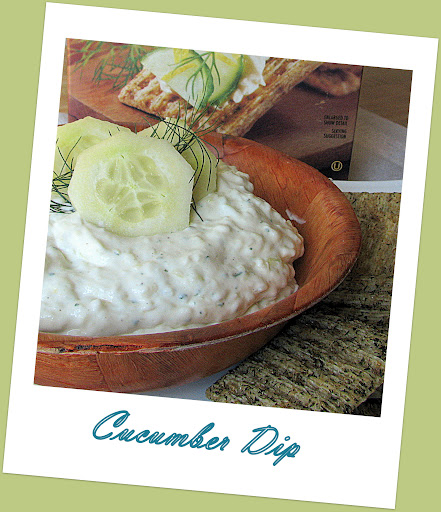
I got this recipe from my friend at Simply Nanna and it makes a great refreshing dip. When I make this, I add 2 - 4 large cucumbers because I love, love, love cucumbers. It’s a great way to use of some of those cucumbers that are ready in the garden. If you want a milder cucumber taste, add only one cucumber as the origional recipe calls for.

Note:  I used Triscuit Dill flavored crackers for an awesome taste combination. 


2 - 4 large cucumbers
2 (8oz) cream cheese
1 pkg Ranch Dip Mix
2 Tablespoons Mayo

Slice cucumber and chop very fine (I put it in my mini chopper) and set aside.

Put cream cheese in bowl and add Ranch Dip mix, mayo, and chopped cucumber. Mix well and serve.  

Crepes with Fruit….Yummy!

I don’t know what happened, but this morning I decided to make crepes. I haven’t made crepes in years and I had forgotten how easy they are to make. If you can make pancakes, you can make crepes.
1 1/2 cups milk
1 cup all-purpose flour
2 eggs
2 tbs sugar
1 tbs cooking oil
In a bowl combine milk, flour, eggs, oil, and sugar. Beat with mixer until well blended. Heat a lightly greased 6 inch skillet. Remove from the heat. Spoon in 2 tbs of the batter, life and tilt the skillet to spread batter. Return to heat; brown on one side only. Invert pan to remove crepe. Repeat with remaining batter, greasing skillet occasionally. Makes 18.
Fill crepes with whipped cream and your favorite fruit.

Super Easy Bread for the Bread Machine


I must confess that I don't usually make homemade bread. At least not until I picked up a bread machine. Making bread always seemed so intimidating and now I just dump everything into a machine and it does it for me.

I grew up helping my grandmother make the most awesome homemade rolls. I have many memories of standing her her kitchen kneading the dough. I can still see her hands as they worked.

If you like the taste of homemade bread but don't have the time to do it by hand, pick up a bread machine. You can buy them second hand at yard sales and thrift stores if you don't want to spend the money for a new one.
 
Ingredients

2 3/4 cups bread flour
1/4 cup canola oil
1 teaspoon active dry yeast
1/4 cup white sugar
1/2 teaspoon salt
18 tablespoons warm water


Directions

Place ingredients in the pan of the bread machine in the order recommended by the manufacturer. Select White Bread cycle; press Start.

Here is a very simple but very good bread recipe. If you don’t own a bread machine, you can pick one up and your local Goodwill or yard sale. I paid about $2.00 for the one I use and I gave one to my niece that I picked up for around $20. This is a great option for people who are short on time. You just throw everything in and the next thing you know, you have fresh bread! It’s also great for making cinnamon rolls or dinner rolls

CINNABON CINNAMON ROLLS RECIPE

I love to make these Cinnabon Cinnamon Rolls and using the bread machine makes it super easy.
 
 
You will need:
 
1 cup warm milk (110 degrees F/45 degrees C)
2 eggs, room temperature
1/3 cup margarine, melted
4 1/2 cups bread flour
1 teaspoon salt
1/2 cup white sugar
2 1/2 teaspoons bread machine yeast

Place ingredients in the pan of the bread machine in the order recommended by the manufacturer. Select dough cycle; press Start.